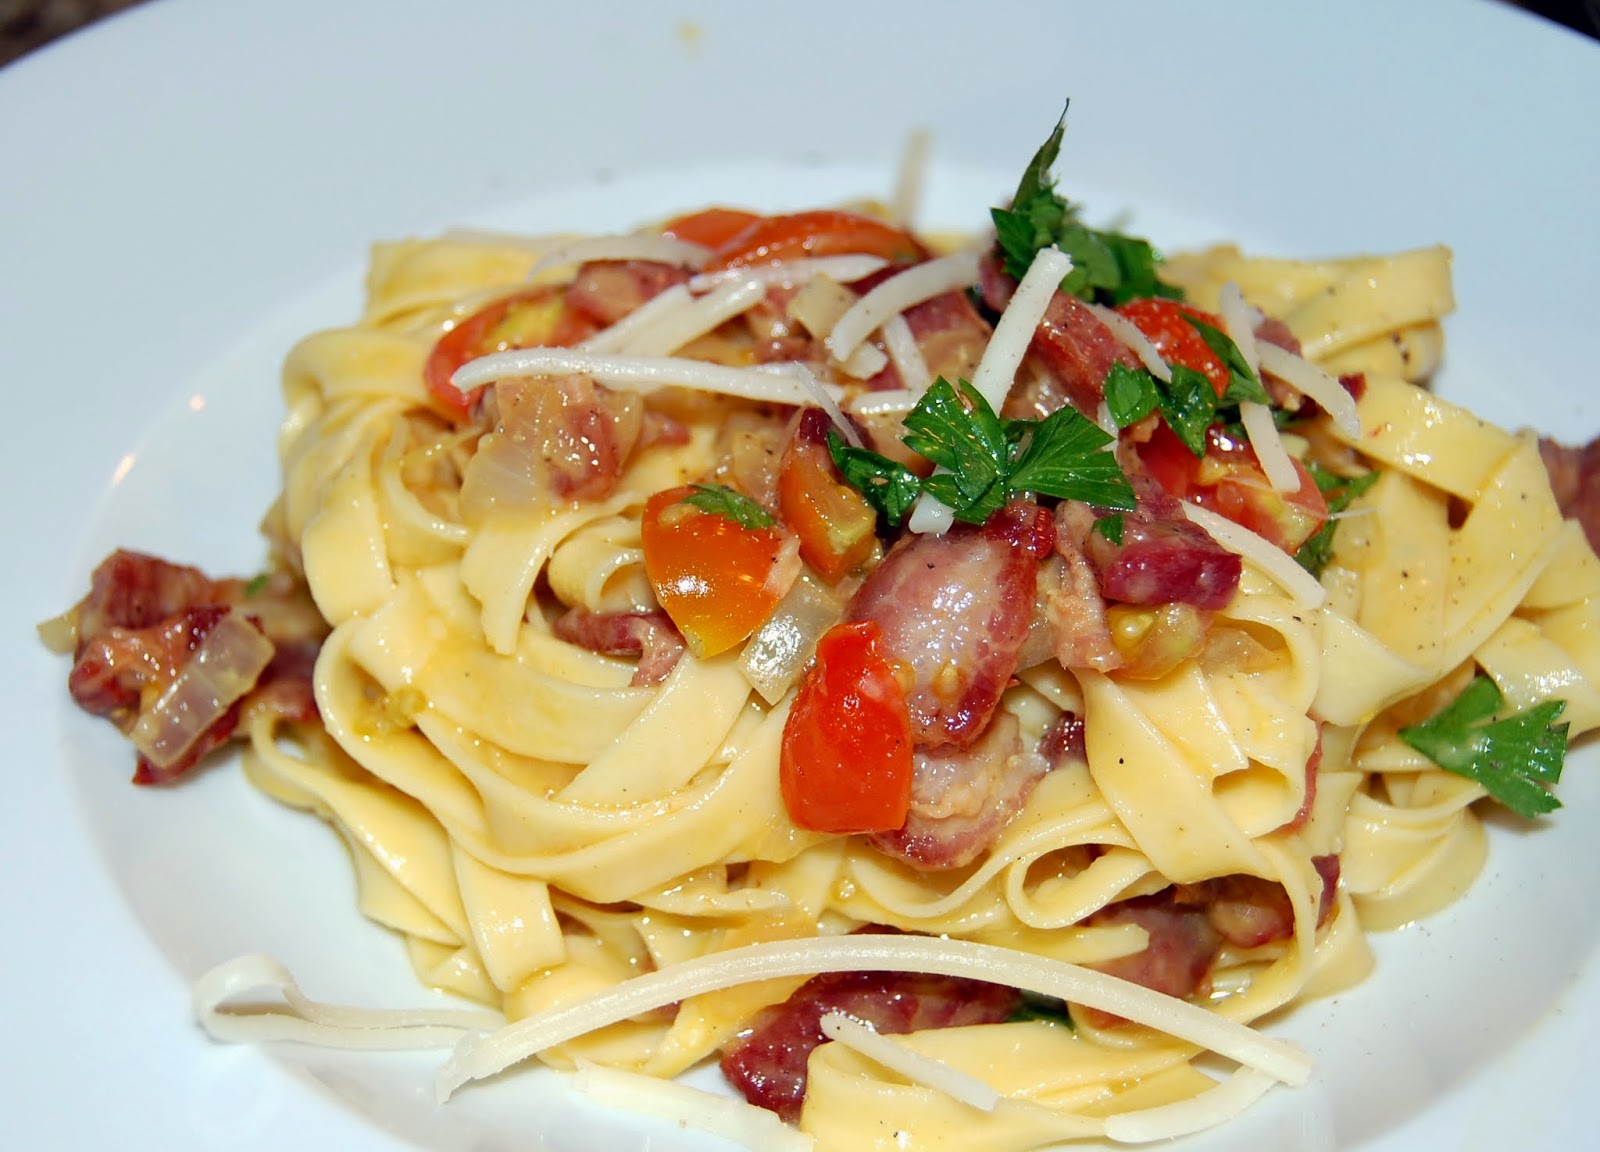
I love Sunday night dinner. There is something comforting and simple about sitting around with family on a relaxing evening to signal the end to a fun weekend and the start of a new week. My go to dish on Sunday nights is roasted chicken, but I do mix it up with other seasonal dishes for some variety -- like pasta carbonara. Bacon and pasta with a rich sauce, what's not to love (push those ideas of calories out of your head right this minute, they are distracting!).
Here is the recipe - I've added some of my favorite ingredients like tomatoes and wine to balance out the richness of the dish. Enjoy with some bread and wine!
Ingredients
4-6 slices of thick bacon
1 lb of pasta
1 onion, chopped
1 clove of garlic, diced
1 cup of sliced cherry tomatoes
1/4 cup of dry white wine
4 eggs
1/2 cup of grated parmesan cheese
2 tablespoons of fresh Italian parsley, chopped
2 tablespoons of shredded parmesan cheese
salt and pepper
Preparation
1. Cook pasta until al dente. I highly suggest using fresh pasta if can get your hands on it. It makes the world of difference.
2. Coarsely chop bacon and cook in a skillet over medium high heat until slightly crisp. Remove with a slotted spoon.
3. Pour off all but 1 tablespoon of the bacon fat and add chopped onions to the skillet. Cook until tender (6-8 minutes). Add garlic and cook for another minute until tender. Add tomatoes and wine, cook for two more minutes.
4. Meanwhile, whisk eggs and 1/2 cup of parmesan cheese in a bowl.
5. While the pasta is still warm, add the egg and cheese mixture to the pasta.
6. Then add the bacon and tomato and onion mixture to the pasta. Season with salt and pepper.
7. Spoon pasta into shallow bowls, sprinkle with shredded parmesan cheese and parsley. Serve immediately.
Perrr....fect. I snagged the computer while Mommy is making dinner/folding clothes/cleaning and Daddy is looking at his awesome phone. Daddy is so lucky and cool.
Anyway, while I have some alone time here with you, I wanted to share a little secret. Come closer. Closer... okay. Listen.
This food blogging thing is a sham.
Seriously. She makes all that good food, posts pictures up on the internet/face page or whatever, and eats it with Daddy. Everyone oohss and awwws (looks so tasty!) but this is what WE, her own children, get.
Yup. Your eyes aren't playing tricks on you. Chicken nuggets and broccoli. And no, there is no fancy sauce on the broccoli (cheese might be good for a change) and the nuggets are NOT made-from-scratch. This is what really happens inside a food bloggers home for dinner.
I took a picture for proof, while Mommy smiled, quietly getting excited about my future potential as a food blogger or even, a chef. Ha! I fooled her, it's all part of a larger plan to build the case about the poor quality of service here at home. I'm starting with nutrition.
So there it is, the TRUTH from the inside. Don't worry, I'll survive here. I score good over at grandmom's and generally, sneak this terrible excuse for food to the four-legged fur ball. He owes me something good one day, like tunneling me out of here so I can escape and get some real food. Like delicious McDonalds.
Every once in a while on a weekend, I am just not up for making the trek up to DC for dinner (and as it turns out, my husband is never up for that trip). So it's good to have a few options closer by that aren't a chain restaurants plagued by mediocre food and loud, noisy tables.
The Wine House is now one of those local restaurant spots that I would definitely frequent again. The wine selection is fantastic, the menu options are good (think standard dinner options like steak, crab cakes, lamb with a few twists such as eggplant risotto and paella), and the atmosphere is relaxing and quaint.
We visited on a Saturday night and the dining room was full. We selected a wine from the racks around the room (added plus for fun wine experience) and started with the cheese and charcuterie plate. I selected the F-Bomb wine, a small batch red wine blend (which admittedly, I selected based on name alone) and it was nice bodied wine with dinner.
For dinner, I opted for the paella which was a special for the evening. It was rich and full of fish, chorizo and tomatoes. It was tasty, but a little lighter than I'm used to in a paella dish.
Dessert is a must - we had the white chocolate and sun dried cherry bread budding. It was doughy, sweet and delicious. The service was friendly and attentive, with some hiccups when the restaurant filled up but overall, well done.
It was a fantastic evening at The Wine House - solid food, and great wine without the hassle of going downtown to a crowded wine bar.

I don't know what it is, but I find the older I have gotten, the more and more I love me some veggies. I'm thinking it's because I generally don't use the kind that come in canned form anymore... but I can't be sure. Regardless, I definitely taken to using vegetables in a main dish because sometimes, they can be better than meat (gasp! did I just say that aloud!?!).
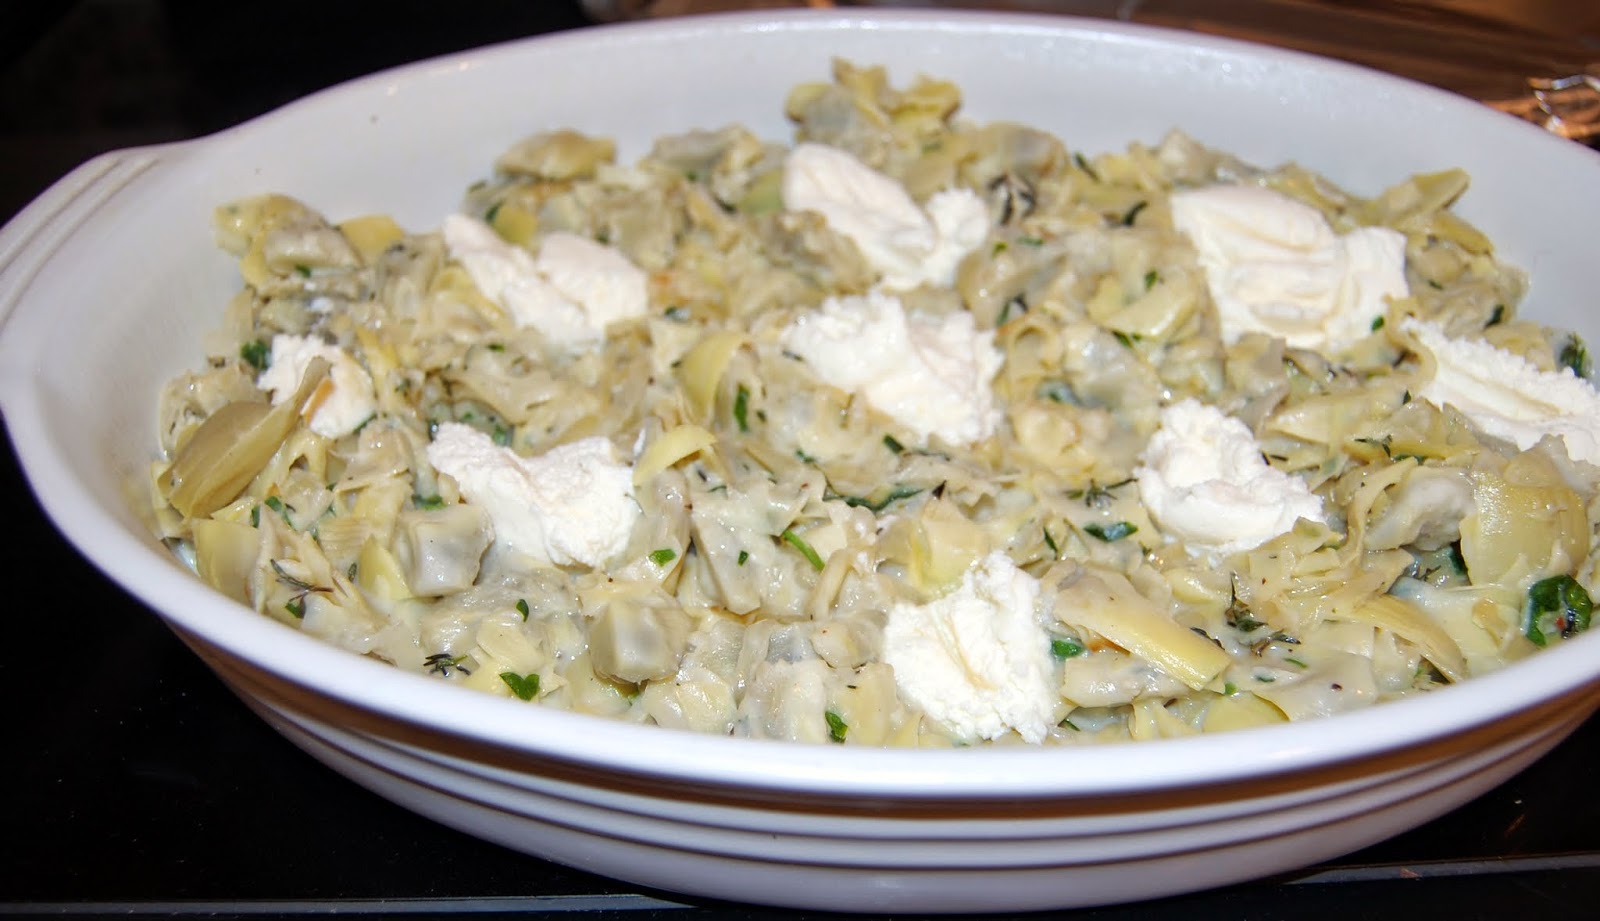
Here's a great recipe for artichoke au gratin that you can serve as a side dish with ham or fish, or serve as a main dish with some bread and a bean salad. (the recipe is based off of the cookbook Plenty)
Ingredients
3 8oz bags of frozen artichoke hearts
2 yellow onions
1/4 cup of olive oil
1 tsp of dried thyme
6 tbsp. of fresh parsley
4 tbsp. of butter
1/3 cup of flour
1 cup of water
1 cup of milk
1 cup of ricotta cheese
1/4 cup of parmesan cheese
Preparation
1. Thinly slice the onions with a mandolin (or very thinly with a knife). Preheat the oven to 375 degrees. Boil a pot of water over high heat. Add the frozen artichokes and simmer for about three minutes. Drain artichokes.
2. In a large skillet over medium heat, add the olive oil and onions, sprinkling with salt and pepper. Sauté onions 6-8 minutes until tender. Add the thyme and parsley, cook with onions for 1-2 minutes until fragrant.
3. Add the artichokes to the onion mixture and cook for one minute. Remove from heat and set aside.
4. In a separate saucepan, melt the butter over medium heat. Whisk in the flour to make a smooth paste and cook for about 2 minutes, whisking to not brown. Mix the water and milk together and slowly whisk into the flour paste 1/4 of a cup at a time. Continue to whisk on low heat for about 8-10 minutes until thick and creamy.
5. Add the sauce to the artichoke mixture. Butter a large casserole dish and add the artichoke mixture.
6. Sprinkle the dish with parmesan cheese and drop in large spoonfuls of the ricotta in the artichoke mix around the dish. Cover with foil.
7. Bake in the oven covered with foil for 30 minutes. Remove the foil, increase oven temperature to 400 degrees and cook for 15 minutes until the cheese is bubbly and golden. Serve immediately.
Whew, things got a little crazy there for a few hot minutes (or all of March), but I am back after a hiatus. I wish I had a cool story to share about my adventures from when I disappeared or something close to an excuse, but I have neither. Just pure laziness combined with a busy schedule.
Regardless of my whereabouts, I am back!! I know, you missed me tremendously and just so you know, I missed you too. (and I think my Twitter account missed me most of all)
So, to celebrate we toast with champagne and breakfast scones. A light brunch treat, scones are great with jelly and perfect with morning mimosas. Also, an breakfast idea you can make the night before to serve during an Easter egg hunt.
Ingredients
2 cups of flour
1/4 cup of sugar
1 teaspoons of baking powder
1/2 teaspoon of baking soda
1/2 teaspoon of salt
1 stick of butter, cut into pieces (4 oz)
1/4 cup of dried fruit (cranberries, blueberries)
2/3 cup of buttermilk, plus more if needed
1 egg mixed with 1 tablespoons of milk
Sugar in the Raw for sprinkling
Preparation
1. Preheat oven to 375 degrees. Combine flour, baking powder, baking soda and salt in a food processor and pulse until mixed. Add the pieces butter and pulse again until well blended.
2. Move flour mixture to a large bowl. Add in dried fruit and buttermilk and mix with a spoon. Then get your hands in there to mix together until the dough comes together in a loose ball (like biscuit dough).
3. Turn the dough out on a floured surface. Knead lightly by folding together a few times and then shape into a circle about 1 inch thick. Cut dough into triangles (like pizza).
4. Put scones on a baking sheet lined with parchment. Whisk together egg and milk in a bowl.
5. Brush scones with egg mixture and sprinkle with "Sugar in the Raw." Put in the oven and cook for 20 minutes until golden brown.
6. Remove from oven and serve warm with jelly and clotted cream (or just jelly since clotted cream can be hard to come by!).
Valentine's Day is tomorrow and if you are like me, you might be totally snowed in and things are looking a little bleak for a full on Valentine's Day celebration. Well, worry no more! I have the easiest Valentine's Day dessert recipe for you... so you can focus on sipping wine instead of cooking. All you have to do is make it to the store to pick up a few key ingredients.... so bundle up!
Ingredients
1 box of chocolate cake
1 box of instant chocolate pudding mix (3.9 oz)
2 eggs
1 3/4 cup of milk
3 tablespoons of unsweetened cocoa
1 12 oz bag of semi-sweet chocolate chips
1/2 cup of confectioners' sugar
Preparation
1. Preheat the oven to 350 degrees. Grease and lightly flour a bundt pan. Combine the box chocolate cake mix, chocolate pudding mix, eggs, milk, and cocoa in a large mixing bowl.
2. Mix with a mixer on low speed for a minute and then increase the mixing speed to medium and mix for 2 minutes.
3. Add chocolate chips to the bowl and blend with a spoon.
4. Pour batter into the bundt pan. Cook in the oven for 45 minutes, until a toothpick inserted in the cake comes out clean.
5. Invert pan on a wire rack and cool for 10-15 minutes.
6. After cooling, move cake to a plate and sprinkle with confectioners' sugar.
7. Slice and serve with a kiss!
I've gone out to Founding Farmers a few times for lunch when I worked in the District and it was most certainly a welcome lunchtime treat (in comparison to the usual option -- cafeteria food). So the other night, when a friend and I were trying to find a place to eat convenient for the both of us (driver and metro-rider), Founding Farmers fit the bill. Easy to get to (and park) on Penn Ave, and it was a Monday night so we thought it was a solid pick.
We arrived at the restaurant and it was packed. A bit surprising for a Monday. We waited a few minutes for a table and the hostess told us they had a table ready *but* we would have to exit at 8:15pm for a reservation. Seeing as how it was 6:30pm, we thought this was do-able. What we forgot was, this is highly dependent on the wait staff and kitchen. We naively took the table.
The table was actually a shared dining table with two other parties (not the norm for Founding Farmers) and to be honest, it was a bit odd to sit that close to people I have never met to dine with. To start, we ordered the pickled vegetables. I love pickled vegetables but these were a little off. They had a too much lemon flavor and fell short of the crispy deliciousness of a pickled carrot. Disappointing.
For dinner, I ordered the shrimp and grits. It was creamy and delicious, full of shrimp and sausage. It was definitely a huge portion size and I couldn't finish it but overall, a solid dish.
My friend ordered the chicken and waffles. Sadly, the gravy came out cold. When we found the waiter, he quickly replaced the gravy but we all know how annoying it is to sit with a plate of food in front of you that you can't eat because one of the items is missing/cold. The chicken and waffles were okay but nothing to rave about.
After dinner, we noticed it was closely approaching 8pm and we needed to GET OUT for the other reservation. We tried to pick a dessert as fast as possible and unfortunately, the dessert we picked, the beignets, took 20 minutes to prepare. So as a consolation prize, we ordered the red velvet cake. It was gargantuan. Two people could barely but a dent in it. It reminded me of dining at Costco (and tasted a like it too).
The check came quickly and we left. Overall, it was a sub-par meal (B-) and felt very much like a cattle call dining experience -- loud, rushed and overhyped.

Well, today we are supposed to get a boat-load of snow (that's the technical term) in the DC area which pretty much means CHAOS. Schools are closed, the government is closed, and grocery stores have bare shelves. 5-8 inches of snow means we will be holed up in our houses for 3-4 days.
We are admittedly, babies about inclement weather. By the reaction of folks, you would have thought the end was near. I think we might benefit from some lessons from our friends in Colorado and Chicago.
Given the snowy conditions, here my top 3 favorite meals to warm up with....
Curried Lentil Soup
Chicken and Dumplings
Guinness Beef Stew
I thought I would share so you could prepare a nice, warm meal tonight to enjoy with a toasty fire and watch the snow fall. Happy Snow Day!
I dig spoon bread. It's a lighter version of a casserole and a heavier version of a soufflé. It can be served along side a bowl of soup for a cozy dinner (double bonus.. you can eat it with the same utensil you eat your soup with -- your spoon!). Or you could serve it for brunch. Look at that, it's so versatile.
Here's the recipe - dig in and enjoy!
Ingredients
1 cup of diced ham
1/2 cup of chopped onion
1/2 cup of chopped pepper
1 tablespoon of butter
2 3/4 cup of milk
2 teaspoons of sugar
1 teaspoon of dried thyme
1 cup of yellow cornmeal
2 egg yolks, beaten
1/2 cup of shredded cheddar cheese
3/4 cup of pepper jack cheese
4 egg whites
Preparation
1. Preheat oven to 375. Butter a 1 1/2 quart dish. Heat a sauté pan over medium high heat and melt the butter. Add the ham, onion and pepper and sauté until tender, about 8-10 minutes. Remove from heat.
2. In a large sauce pan, combine milk, sugar, thyme over medium high heat. Heat until it simmers and then add cornmeal in a constant, slow stream to the milk while whisking constantly. After the cornmeal is added, heat for a minute or two while whisking until the mixture thickens.
3. Transfer cornmeal to a large bowl, add the egg yolks and let stand for 8 to 10 minutes.
4. While the cornmeal mixture sits, beat egg whites with a mixer until stiff peaks form.
5. Add ham, onion and pepper, cheddar cheese, and pepper jack cheese to the cornmeal mixture.
6. Mix in 1/3 of the egg whites into the cornmeal mixture with a spoon. Fold in the remaining 2/3 egg whites using a rubber spatula.
7. Using the spatula, scrape cornmeal mixture into the buttered dish. Bake at 375 degrees for 50 minutes until puffed, golden brown and set in the center.
8. Serve immediately with a spoon!
I love pickling. I grew a darn vegetable garden just so I could experiment making different varieties of pickled spicy green beans!
So I decided to combine my love of mason jars & pickling with a new trick - fermenting food. According to my initial research (e.g., the internet), one of the easiest foods to ferment in a jar is home-made sauerkraut. I love pork and sauerkraut so, SOLD.
Here is what I did and it was very simple...
Ingredients
1/2 head of cabbage
3/4 tablespoon of kosher salt
water
2 mason jars
cheese cloth or just a regular cloth
Preparation
1. Remove the outer leaves of the cabbage and reserve. Cut the cabbage in half and use only one half of the head. Save the other 1/2 for later.
2. Slice the cabbage into strips.
3. Place cabbage in a bowl and sprinkle with 3/4 tablespoon of kosher salt. Gently massage salt into the cabbage and mix with your hands for about 10 minutes, until the cabbage begins to wilt.
4. Place cabbage and juice from the bowl into two clean mason jars. Press down cabbage with your hand so it is packed tightly.
5. Fold one of the green outer leaves and place on top of the chopped cabbage in the mason jar and push it down. This should help submerge the cabbage in its juices as it ferments.
6. Cover with cheese cloth so air can pass through but the jar remains clean of dust/dirt. Secure into place with a rubber band. Put jars in a place away from sunlight and where it is relatively cool (like the basement).
7. When it has been 24 hours, check on the jars and press down cabbage. If there is not enough juice from the fermentation to cover the cabbage completely, you will need to add more liquid (I did). Dissolve 1 teaspoon of salt in one cup of water and add to each jar until the cabbage is fully submerged.
8. After 5 days, your cabbage is ready! Remove the top green leaf and place in the refrigerator. Serve with pork or bratwurst and mashed potatoes.