Tuesday, April 30, 2013

Creamy Mac and Cheese with Peas and Pancetta


Homemade macaroni and cheese is one of my favorite side dishes.... it's such a wonderful comfort food.  The standard macaroni and cheese with cheddar cheese, breadcrumbs, etc. is delicious, but sometimes it can be fun to create a new mix.  Like this re-vamped version with guyrere cheese, peas and pancetta.  This is not your normal mac and cheese.  Yes, it's creamy and comforting but it's also a bit savory and rich.  A new twist to a tried and true side dish. 

Ingredients
8 oz of whole wheat elbow macaroni
2 cups of milk
1 shallot
3 oz of pancetta
1 cup of frozen peas
1 1/4 cups of gruyere cheese
1/4 cup of parmesan cheese
2 tablespoons of flour
3 tablespoons of butter
salt and pepper

Preparation
1.  Preheat oven to 400 degrees.  Using a large stock pot, boil 6 cups of water with a dash of salt.  Add macaroni and cook until al dente (approximately 8-10 minutes).  Drain.  Dice/chop the shallot and pancetta into small chunks and slivers of meat.


2.  Heat a skillet over medium-high heat.  Add a tablespoon of buter, heat until melted.  Add the shallots and pancetta to the skillet.  Cook for 10 minutes until shallot is tender and pancetta is crispy on the edges.  Remove from skillet.

3.  Shred gruyere and parmesan cheese.

4.  Lower heat in the skillet to medium.  Add the two tablespoons of butter and heat until melted.  Add the 2 tablespoons of flour to the butter and mix until thick.  

5.  Slowly add the two cups of milk to the butter/flour roux whisking constantly.   

6.  Allow the sauce to thick over the low heat, stirring constantly for about 10 minutes.  Add the cheeses to the sauce whisk until melted.

7.  Add the pancetta and shallot mix to the sauce.  Lower the heat to low.

8.  Add the macaroni and peas to the sauce.

9.  Season to taste with salt and pepper.

10. Spoon macaroni and cheese into buttered individual serving dishes or a casserole dish. Sprinkle with a dash of parmesan cheese. Cook in the oven at 400 for about 10-15 minutes until the tops are lightly toasted. Serve with your favorite salad!


Friday, April 26, 2013

April is National Grilled Cheese Month!


I love a toasty, warm grilled cheese sandwich.  The butter finish and the gooey cheesy inside is like heaven.  I grew up eating grilled cheese with Miracle Whip mayo (this may sound nasty, but don't judge until you try!) and I still love them.  But I also love other types of grilled cheese sandwiches.  So, for National Grilled Cheese Month, I thought it only appropriate to have a grilled-chesse-off in celebration.  

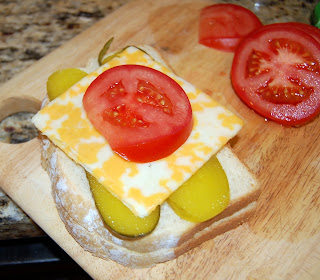
The competitors showcased two different types of taste -- bitter and spicy.  The bitter contenter was the Pickled Grilled Cheese featuring tomatoes, dill pickles, and colby cheese.  The spicy challenger was the Spicy California Grilled Cheese with jalapeno peppers, monterey jack cheese, avocado, and Sririacha mayo.  

Pickled Grilled Cheese

Ingredients
2 slices of sourdough bread
1 slices of tomato
2 dill pickle slices
2 slices of colby cheese
1 tablespoon of butter

Preparation 
1.  Layer on the bread the pickles, 1 slice of cheese, 1 slice of tomato and then the other slice of cheese.  Top with the other slice of bread.


2.  Warm a skillet over medium high heat.  Melt one tablespoon of butter.  Grill the sandwich on one side for about 3 minutes, until golden brown.  Flip and grill the other side of the sandwich.


3.  Remove sandwich from the skillet with a spatula.  Cut in half.  Serve with chips!


Spicy California Grilled Cheese

Ingredients
2 slices of sourdough bread
1 slices of tomato
3 slices of avocado 
1/2 jalapeno, diced** (optional, only if you like really spicy!) 
3 tablespoons of mayonnaise
1 tablespoon of Srirachi hot sauce
2 slices of Monterey Jack cheese
1 tablespoon of butter

Preparation
1.  Mix mayo and hot sauce in a small bowl.  Slice the avocado.


2.  Dice the half of the jalapeno. Spread the hot sauce/mayo mix on both slices of bread.  On top of the bread, layer the tomato, 1 slice of cheese, sprinkle with the diced jalapeno, and then the slices of avocado.  Top with 1 slice of cheese and the other piece of bread.


3.   Warm a skillet over medium high heat. Melt one tablespoon of butter. Grill the sandwich on one side for about 3 minutes, until golden brown. Flip and grill the other side of the sandwich.  Remove sandwich from the skillet with a spatula. Cut in half.


It was a tough choice.  The pickles in the Pickled Grilled Cheese gave a nice bite to the creamy cheese.  But the Spicy California was a better mix of ingredients and flavor -- the balance of the spicy pepper with the smooth avocado and creamy cheese was delicious.  It was the clear winner (and Srirachi mayo was the icing on the cake).  Be sure to enjoy and celebrate with some grilled cheese this month!  

Tuesday, April 16, 2013

Brunch at Maple Ave Restaurant

Make reservations.  There are nine tables in this tiny little restaurant on Maple Avenue in Vienna.  We showed up for brunch at 9:50am (they open at 10am) and waited outside with two other parties for the restaurant to open.   Lucky for us, we were able to get a table before another brunch reservation at 11:15am.  So I guess it's true, good things come to those who wait. 

Maple Ave Restaurant is a small, simple restaurant in Northern Virginia (gasp! not located in DC!?!) that serves eclectic American cuisine comprised of Asian, Latin American and French flavors.  Maple Ave Chef Tim Ma is a nominee for a RAMMY in the category "Rising Culinary Star of the Year."  And since I went to Blue Duck Tavern on Thursday (nominee for Fine Dining Restaurant of the Year) and Green Pig Bistro on Saturday (another nominee for Rising Culinary Star of the Year), it was only fitting that on Sunday, we go to Maple Ave Restaurant to complete our RAMMY nominee circuit.  You know, in case someone steps down from the judging panel, I want to make sure I'm ready.  

The menu at Maple Ave is deliberate and focused, offering a select number of brunch plates, small plates, and a brunch tasting menu.  As an added bonus, they have a bottomless brunch cocktail special for $15 and you can pick/vary any brunch cocktail you would like (mimosa, poinsetta, and bloody mary).  Maple Ave also sources local ingredients from some of my favorite farms in the area, like Polyface (where we get our meat and eggs from for our family).  I truly appreciate a dining experience that emphasizes not just the final product, but places importance on sourcing sustainable ingredients.   


To start, I ordered a mimosa and coffee.  The mimosa was delicious, perfect mix of champagne and orange juice to start  off the morning.  The coffee, served in a French press, was rich and bold.  I loved the serving of the coffee in a french press.  It's that sort of attention to detail that sets apart a dining experience. 


For brunch, I decided on the Eggs and Kimchi which consisted of scrambled eggs mixed with chinese sausage, jasmine rice, and caramelized kimchi with a slice of grilled Spam.  There was no way that I was going to pass up such an interesting and spicy egg dish.  It was outstanding... I loved the eggs with the spicy kimchi, it was a delicious pairing and a great use of a non-traditional brunch ingredient (I do love surprises!).  The sausage mixed with the eggs added a savory, salty flavoring while the Spam served as a whimsical addition.  Definitely one of the most creative and spicy delicious brunch dishes I've had in a while. 


My husband opted for the truffled eggs served with applewood smoked bacon, potato hash and mesclun.  The slight truffle flavoring of the eggs was tasty and added richness to the dish.  Again, a well executed brunch plate with an emphasis on select flavors.  I really enjoyed the attention to the main ingredients in each dish.  Too often you eat dishes that are sort of all over the place -- too many flavorings, too many ingredients.  Not the case at Maple Ave, and it was refreshing.

Overall, we had an exceptional brunch dining experience at Maple Ave.  Based on my experience, I would say Chef Ma is a strong contender as a Rising Culinary Star of the Year.  Best of luck for the RAMMY award! 

My take away is -- excellent food in a non-pretentious setting with great service.  I will definitely head back for dinner!   


Maple Ave on Urbanspoon    


Monday, April 15, 2013

Banana Bread


My kids eat a lot of fruit -- strawberries, grapes, oranges, apples, kiwi, you name it.  They love fruit.  And they especially love bananas.  My oldest son will not eat a sandwich for lunch so I usually have to send him to school with granola, a banana and yogurt.  Needless to say, we have a lot of bananas in our house. 

Bananas ripen quite quickly and turn from firm to mushy.  Which makes it no longer 'lunch pack-able' for my son.  So, in order to not waste ripe bananas, I use them to make banana bread.  A super easy recipe (you don't even need to use a mixer!) and a tasty, healthy snack.   For variety, add chopped pecans! 

Ingredients
3 ripe bananas
1/3 cup of melted butter
1 cup of brown sugar
1 egg
1 teaspoon of vanilla
1 teaspoon of baking soda
1 pinch of salt
1 1/2 cups of flour

Preparation 
1.  Peel and mash the three ripe bananas in a bowl.


2.  Melt the butter and mix with the bananas.


3.  Beat the egg and vanilla in a small bowl.  Mix the brown sugar and egg mixture with the bananas.


4.  Add the baking soda and pinch of salt to the bananas and stir.


5.  Mix in the 1 1/2 cups of the flour with the bananas.


6.  Preheat the oven to 350 degrees.  Butter a loaf pan and pour the batter in the loaf pan.  Cook in the oven for 50 minutes (until you can insert a toothpick and it comes out clean).


7.  Cook on a wire rack.  Remove from pan and slice to serve!


Tuesday, April 9, 2013

PICKLE ME! Pickling Class at 918 F Street


I've never done a cooking class before.  Not because I don't need one, rather I've never made the time and the cost for the classes seemed a little excessive to me (really, $90 for a fondue class?  to melt up some chocolate?). 

But the other day, I found a Living Social deal to go to 918 F Street, Living Social's own little microcosm of a community, to attend a pickling class.  And it was super reasonable -- only $40.  Not to mention, I'm in the process of growing some veggies that I fully intend to pickle this summer.  So I was down with some pickling class.

The class was lead by Chef Matt Finarelli, a chef who specializes in culinary instruction (and has spent time in restaurant kitchens).  He was very nice, informative, and amusing - all great qualities in a teacher.  To be honest, I am totally jealous of Chef Finarelli's job.  I love to cook and would love to cook for others but I do not have the interest in working long nights behind the line at a restaurant.  I was a waitress for TOO LONG and I know how much a restaurant sucks at 2am while you are cleaning your tables.  I don't care if you get to hang out at the bar after and get free drinks.  It is not worth it to me. Being an instructor sounds perfect - normal hours, cooking and drinking wine while you cook (my favorite part).  And you get paid.  What's not to love?  Anyway, I digress.


During our pickling class we learned about the 'slow pickle' and the 'long pickle' and the proportions of water, salt, sugar and vinegear.  We even learned a little chemistry.  And we learned how to tie a sachet.  Lots of learning and no test.  Perfect. 


We each had a station with all the kitchen equipment and portions for making the recipes.  It was awesome because you could adjust want you wanted and learn from the hands-on experience.  I am also proud to note that we spilled nothing and were rather clean in our cooking... extra credit points for that!

During our class we made two pickled items - oysters and vegetables.  The vegetables we got to take home (and I was nice enough to share with my husband).  The oysters we pickled over the duration of the class and ate at the end.  Here are the oysters, pickling...  the BEFORE shot.


And here is the AFTER picture.  Yummy oysters with a light salty finish, topped with tangy pickled cucumbers.


As we pickled our vegetables, we talked about canning, pressurized canning, vinegars, and salt.  Oh, and the best vegetables to pickle!  I also figured out how to make my own homemade pickled spicy green beans. 

Here is the can of veggies we pickled at class with red wine vinegar.  I've never had pickled tomatoes before and these were outstanding.  It's like a fresh sliced tomato with salt (one of my favorite snacks) but more juicy. 
  

An awesome class at 918 F Street with Chef Finarelli, I plan to pickle up a storm this summer with veggies from my garden. 
    

Monday, April 8, 2013

Food Bloggers Against Hunger: Budget Friendly Recipe for Ham & Asparagus Casserole


Today, I have joined with 200 other bloggers in Food Bloggers Against Hunger.  We are all donating a blog post on Monday, April 8 to raise awareness about the issues of hunger in America.   In this country, we subsidize the wrong products.  Millions of Americans live in food deserts without access to healthy ingredients.  The foods we should eat, like fruits and vegetables, are more expensive than chips, sodas and processed foods that are available.  We currently spend a mere $1 per week per child in school meal progreams.  Food stamp participants are only allocated $4 a day to survive.

SNAP—the nation’s food stamp program—is at risk for severe cuts that would impact millions of families, especially children, that rely on school meals and food stamps to survive. In response to the film, the country's leading anti-hunger organizations, Share Our Strength, Bread for the World, Feeding America, and The Food and Research Action Center, are asking supporters to help spread the word. 

If you are interested about this topic and would like to take political action, you can contact Congress here to share your thoughts.  To learn more, watch A Place at the Table on iTunes or on Amazon.

Here is my budget friendly recipe using healthy vegetables (asparagus) and protein-rich meat (ham) -- Ham and Asparagus Casserole.  The thing that I like about this recipe is that it uses spring, seasonal vegetables and you can use your leftover ham from holiday dinners.  An easy way to be health conscious and not let food go to waste.

Now, I usually don't itemize the cost of food.  So for this post, I thought I would actually pay attention and become more knowledge about the rising cost of quality food. I actually calculated the cost of this meal and it turns out, this dinner costs $2.85 a person.  That's over half of the $4 DAILY FOOD ALLOWANCE allocated through the food stamp program.  WITHOUT any drink, dessert or a side salad.  And this is a simple, bare-bones recipe for a quick, weeknight supper.  So the next time you head to the grocery store, try to calculate how much you spent for one person on the food for that dinner.  You might be surprised.  


Ingredients
1 can cream of celery soup
1 cup milk
1/2 of an onion
1/2 teaspoon thyme
1/2 cup shredded Cheddar cheese
1 1/2 cups herb seasoned stuffing mix
2 cups diced cooked ham
2 cups cut asparagus spears
2 tablespoon butter


Preparation
1.  Cut asparagus into large segments, removing the bottom pieces.


2.  Steam asparagus for 3 minutes until tender.


3.  Dice half the onion.  Melt one tablespoon of butter in a small pan over medium high heat, add diced onion and saute until translucent, about 6 minutes.  Add 1/2 teaspoon of thyme and heat until fragrant, about one minute.


4.  In a small saucepan, combine the cream of celery and milk and heat over medium heat until it starts to boil.  Add the onion mixture to the saucepan and warm until mixed thoroughly. 


5.  Remove from heat and add the cheddar cheese.


6.  Dice the ham.


6.  Butter a 1/2 quart casserole dish.  Layer 1/3 of the dry stuffing mix; top with half of the ham, half of the asparagus, and half of the cheese sauce.  Repeat with remaining ingredients.


7.  Combine remaining 1/3 of dry stuffing mix with 1 tablespoon of melted butter.  Spread on top of casserole.


8.  Preheat oven to 350 degrees and cook casserole for 40 minutes until warm and bubbly.  Serve warm.
 

Wednesday, April 3, 2013

Linger in Denver

Sometimes I get to travel as part of my job.  I used to travel A LOT and now, not so much, which is actually quite nice because traveling for work tends to be exhausting.  But I will say, the cool thing about traveling for work is the ability to go to different cities that you might have not planned a trip to.  The down side is that you rarely get to see the city (rather the inside of a conference room).  

This past week, I traveled to Denver for work and I got to visit one of my favorite people in the whole world.  And, she suggested a fantastic restaurant for us to have a 'girls night out' - Linger. Win, win - good friend, good dinner.

Linger is in the Highlands neighborhood of Denver, featuring floor-to-ceiling windows with a view of the skyline and a hip, urban vibe.  The restaurant itself is open and airy, accented with vintage decor.  I immediately loved the scene - trendy, but not uptight.  And our server was super friendly and very attentive -- he had great recommendations about cocktails to try and menu items that stood out among the rest.  All around, a perfect setting with wonderful service.    

Since I had sat on a plane for about four hours, I was definitely ready for a cocktail.  The La Rosa immediately caught my eye with St. Germain, Aperol, Lemon Juice, Rosemary and Prosecco.  It was absolutely delicious, light and refreshing with a soft sweet finish.  Yum!

 
Linger makes housemade popcorn every evening with variations on different seasonings/flavors.  We sampled some curry seasoned popcorn the night we dined at Linger and it was fun little snack - airy and crunchy with a light dusting of flavor.  It was a nice compliment to the cocktails.


For dinner, our server recommended we chose 3 dishes to share, and after much debate, we settled on the Popper "Breakdown," Mongolian BBQ Duck Bun, and Carrot and Lentil Falafel

The Popper "Breakdown" consisted of sishito peppers, cheddar curds and orange-habanero jam -- cheese and spice, two of my favorite things.  The peppers where lightly sauted and tender while the cheddar curds were flash fried with a crispy outer shell.  This small plate was outstanding.  It was the perfect balance of spice from the peppers with the sweet jam to give it a smooth finish.  Our server recommended grabbing a pepper with a cheese curd and dipping it in the jam.  The trio of these flavors combined was amazing - it just popped in your mouth. 


The Mongolian BBQ Duck Buns were served on a doughy bun topped with tender, succulent duck flavored with scallions and miso-pickled cucumbers.  I also tasted a sweet orange sauce with the duck meat which rounded out the dish.  The duck buns were quite tasty - meaty with a slight bitterness from the pickled cucumbers. 


Our last dish for dinner was the Carrot and Lentil Falafel which were made from garbanzos, cashews, chile, scallion and gingered shittakes into falafel balls wrapped in butter lettuce with a herbs and lemon tahini yogurt dipping sauce.  The falafels were dense little balls with a crispy shell and had a spicy bite to them.  I loved the tahini dipping sauce, it added a depth to the falafel with its creamy texture. 


Even though I was completely full, my friend FORCED (literally, forced!) me to have dessert.  We opted for the Italian "Coffee & Donuts" which were zeppoles served with an espresso-chocolate mousse.  Growing up in NJ, we always used to head to the pizza place after school and order zeppoles for a snack.  So I was skeptical about how Denver might fare in this arena.  And I have to say, I was impressed.  The zeppoles came in a little brown bag that you shook to cover the zeppoles with the powdered sugar.  The dough balls were warm with a crunchy shell and spongy center.  We dipped the zeppoles in the mousse and it was amazing.  A fun dessert with a great presentation and a sweet ending to our dinner.


Overall, I have to say, I loved Linger.  Not many restaurants get everything right - the atmosphere, impeccable service, and delicious food.  But they did.  Well played Linger, well played!        
Linger on Urbanspoon